Note: If you have never built a boat before, a simple pram or duck boat is a great first time boat project because form and function over ride aesthetics and the finished project perfection of say a sailboat. I highly recommend the book, Fiberglass Boatbuilding for Amateurs by Ken Hankinson. Published by Glen-L Marine, I am sure that they have updated it since 1982 when I bought my copy.
 I am set to build my ideal duck boat. The lofting is complete, and I have pulled the offsets. I will update this project with completed steps and photographs. Should anyone discover this site article, and would like to build their own replica, I would be happy to help with plans and off-sets. I will be working on this project during the 2011-2012 winter. So, what is my ideal duck boat?
At 67 I have built or modified a number of floating duck contraptions and boats over a 40-year period. They include:
1. A 10', canvass kayak, layout boat,
2. A 17' Folboat kit,
3. A modified 16' wood, runabout with blind,
4. Zack Taylor's scull boat as featured in Field and Stream magazine,
5. A horse-shoe, canvas floating blind,
6. A classic, 14', fiberglass, whale-back, sneak boat,
7. Modified the hull piece of a 16' speed boat into a duck boat,
8. 13' wood river pram,
9. 15' wood river pram,
10. All-welded, 13' aluminum river pram (blast and cast),
11. 15' all-welded, aluminum river sled with blind,

12. 10' fiberglass layout boat.
14. 14' fiberglass scull boat. This was probably one of the most difficult boats that I built. One problem that will have to be modified is the transom is too low for an outboard.
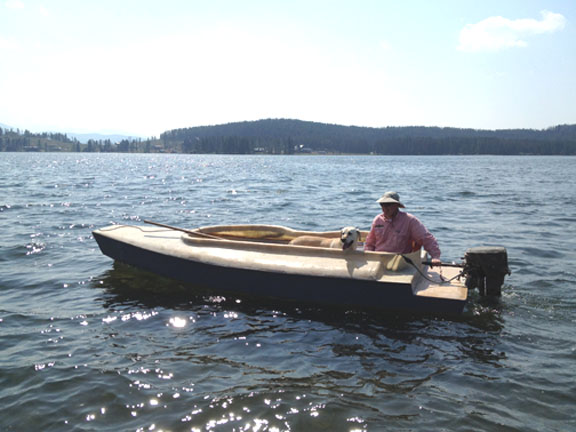
You might ask, "What is the ideal duck boat?" Naturally, the question must be framed as if you could have only one boat. I have two specialized boats, a layout boat and a scull boat. I generally hunt alone so I have to factor in safety, comfort on choppy water, speed, camouflage, and the ability to manhandle the boat in shallow water. About five years ago I just had to have a big, flat-bottom boat to accommodate a Mud Buddy motor and a large blind so I built an aluminum boat. If you like pass shooting, this is the boat for you. Three years in a row I modified the blind by lowering the profile until this year I was sitting on the floor of the boat with a push-forward blind screen that I could nudge over with my shotgun. I discovered what I learned forty years ago. Keep a low profile with natural cover if you want ducks to land right in front of you. I sold the boat this duck season, and I am going back to the designs that were most successful all those years ago, and those boats were inspired by classic sneak boats and scull boats.
I have lofted my duck boat plans to full scale and pulled the offsets. In order to sit sideways in the boat low to the floor, I had to extend the length to fifteen feet. The beam is 5'-10". The cockpit combing will have two features that I have never built in a duck boat before. First, the bow of the cockpit combing will go to a vee to part waves in rough weather. Secondly, the backrest of the cockpit combing will flare out in two semi-circles for two hunters. The reason for this is that I want a fairly enclosed cockpit, but I need to get my back as close to where the deck meets the gunnel line in order to stretch out my 6'-3" frame.
I ended up with a 10% dead rise for the shallow vee hull. I was going to go 6%, but Zack Taylor's Sneakbox widgeon and other sneak boats seem to use a 10 to 12% dead rise angle for a planning hull. (Zack Taylor was a Field and Stream editor and author of many duck hunting articles. His book, Successful Waterfowling, 1974, is an excellent book on the subject and includes numerous plans. I did built his scull boat in the 70's, but it was not a good design. He is best known for his Zack Box.)
1. The front of the cockpit will have a vee to split waves during rough conditions. It should also have round holes or slots recessed in the cockpit combing. During rough water rides, I can drop in a raised, canvass windshield. The windshield will have Velcro attachments to the outside of the cockpit combing.
2. The cockpit combing should be three inches wide to accommodate aluminum pipe or schedule 40 plastic pipe set flat into the cockpit combing. Into these spaced holes I will drop in different size camo screens for different cover or different heights.
3. Devlin's (www.devlinboats.com) boat plans promote the recessed motor mount. I have used this in past designs, but I have never been convinced they hide the motor any better moving it forward. To accommodate this shift in weight of both the motor and the operator, Devlin puts in a 2" rocker in the stern so that his Scaup and his other sneak boats will pull up the nose of the boat in choppy conditions under power.
I took an idea from Gator Trax boats. What Gator Trax did for the transom and motor mount was to add a shallow deck on the stern section. The motor mount is raised up in the center to 16", but the 20" long deck is maybe 10 inches high than the waterline.
Another idea that I will take from Gator Trax is anchor poles. Gator Trax put rings both fore and aft to drop in a pointed aluminum pole to anchor the boat to the bottom. This sure makes it easy to pick up decoys.
4. I will have navigation lights and a head lamp, but what I am thinking of now is a safe place for my new Mr. Heater Buddy. Years ago I found a guy on-line who made an aluminum oven for his heater.
5. I am also thinking of placing a receiver for a winch system in the bow.
Here are the steps in this building process that I will update.
Step 1: Sketch a boat and then draw it to a scale based on 1.5 inches equals one foot.
Step 2: Loft the boat full scale on paper and pull off the offsets for each station rib.
Step 3: Construct a 4x16 elevated building table. Oh, I wish I could do this step over. In my haste, I forget that the garage floor slopes. I should have built a level table based on the garage floor, and then I would not have had to shim so much!
Step 4: Cut out a station rib for each one-foot interval. Note: sometimes you can use two-foot intervals to save money on plywood. Each station rib is cut out with the hull station dimensions, as well as the top decking dimensions. A one-inch by one-inch seam is attached to each side of the station rib. This seam creates a lip for the top and bottom piece to be joined or glued together after the two pieces have been hand laid up and pulled off the plug. Later, when the top piece and the hull are set, I will cut off most of the joining seam and sand it smooth.
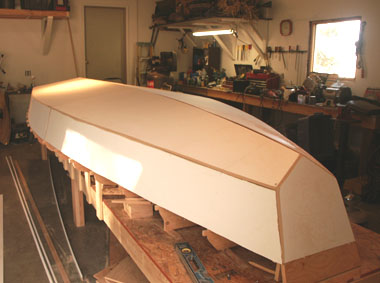
Step 5: Set up all the station ribs with the hull side facing up. I will use 3/8 plywood or panel sheets.
Keep in mind that the station ribs will not be perfect. The test of how accurate they are comes when you attach the skin. I will use 4'x8' vinyl panels for the skin. After all, this is a male plug. Any small imperfections will be lost when you apply the fiberglass layers to the outside of the boat. The vinyl panels are coated, which makes the waxing process easy. Plywood sheets require a lot of extra work before a smooth finish is achieved. I use an air staple gun with brads. These little holes will be filled with wax. The seams will be covered with transparent tape. How easy is that to wax! When the final boat is glued together these slight raisings of tape will be noticed inside the boat! If I was a perfectionist, I could sand them down.
I purchased 1/8 inch panels to pattern the sides and the bottom. You will be amazed at the curve in the side panel. I remember building my first drift boat. My eyebrows jumped in amazement when I saw the finished side panel. I start with an approximate pattern panel with straight edges. I use temporary screws to hold the pattern in place while it rests on the ears. Next, I cut a thin piece of panel and tape it on the pattern panel making sure the bottom edge touches each station ear. (The ear will later be used to make a joining lip both for the hull and the top piece.) Now I trace this piece on to another pattern panel. Once I have the bottom curve, I slap it up on the boat and mark the top of each station. Now I have a final pattern that I can transfer to a 3/8-inch vinyl panel and attach to the station ribs.
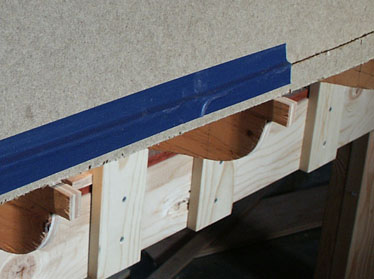
Before I attached the side panels, I used a grinder on the edge of each station that comes in contact with the panel. I used a bender board to see which stations needed to be rounded off. Once the panel is in place, tack the panel on to those stations that squarely meet the panel. This avoids forcing a panel. Instead the panel follows a clean line. Once the panel is attached in a few places, look inside where the panel needs to be shimmed against the station. I counted back to Station 8 and added a thin plywood strips to the station. This allowed me to attach two eight-foot panels to a separate piece of wood instead of trying to join two panels on one 5/8-inch station.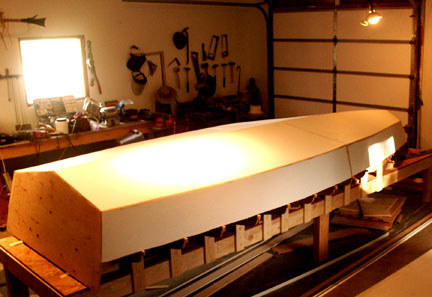
Step 6: Build a cradle to sit over the hull. Flip the boat over so that it sits upright in the cradle. Now, I will construct the deck piece, or the top piece of the plug. Construction material will consist of particle board, fine meshed screen and plaster.
Step 7: Finish the top deck piece. It will consist of lots of plaster. Paint the plaster with at least four coats of plastic varnish.
Step 8: Lay up the fiberglass on the top piece. When it has cured, flip over the entire boat again so that the hull or bottom faces up.
Step 9: Lay up the fiberglass for the hull. Let cure and then pry off both pieces from the mold. Discard the mold because the plastic will break; hence the name, "one-off boat construction."
Step 10: Reinforce the hull with support ribs or bulkheads.
Step 11: Glue the top piece and the hull together using the joining lips.
Step 12: Since this is a boat pulled off a male mold (plug), the outside has to be faired and sanded.
Step 13: Add drain plugs, lights etc.
Step 14: Paint the boat.
Step 15: Fabricate the blind or camo coverings, which includes the splash shield.
I am set to build my ideal duck boat. The lofting is complete, and I have pulled the offsets. I will update this project with completed steps and photographs. Should anyone discover this site article, and would like to build their own replica, I would be happy to help with plans and off-sets. I will be working on this project during the 2011-2012 winter. So, what is my ideal duck boat?At 67 I have built or modified a number of floating duck contraptions and boats over a 40-year period. They include:
1. A 10', canvass kayak, layout boat,
2. A 17' Folboat kit,
3. A modified 16' wood, runabout with blind,
4. Zack Taylor's scull boat as featured in Field and Stream magazine,
5. A horse-shoe, canvas floating blind,
6. A classic, 14', fiberglass, whale-back, sneak boat,
7. Modified the hull piece of a 16' speed boat into a duck boat,
8. 13' wood river pram,
9. 15' wood river pram,
10. All-welded, 13' aluminum river pram (blast and cast),
11. 15' all-welded, aluminum river sled with blind,
12. 10' fiberglass layout boat.
14. 14' fiberglass scull boat. This was probably one of the most difficult boats that I built. One problem that will have to be modified is the transom is too low for an outboard.
You might ask, "What is the ideal duck boat?" Naturally, the question must be framed as if you could have only one boat. I have two specialized boats, a layout boat and a scull boat. I generally hunt alone so I have to factor in safety, comfort on choppy water, speed, camouflage, and the ability to manhandle the boat in shallow water. About five years ago I just had to have a big, flat-bottom boat to accommodate a Mud Buddy motor and a large blind so I built an aluminum boat. If you like pass shooting, this is the boat for you. Three years in a row I modified the blind by lowering the profile until this year I was sitting on the floor of the boat with a push-forward blind screen that I could nudge over with my shotgun. I discovered what I learned forty years ago. Keep a low profile with natural cover if you want ducks to land right in front of you. I sold the boat this duck season, and I am going back to the designs that were most successful all those years ago, and those boats were inspired by classic sneak boats and scull boats.
I have lofted my duck boat plans to full scale and pulled the offsets. In order to sit sideways in the boat low to the floor, I had to extend the length to fifteen feet. The beam is 5'-10". The cockpit combing will have two features that I have never built in a duck boat before. First, the bow of the cockpit combing will go to a vee to part waves in rough weather. Secondly, the backrest of the cockpit combing will flare out in two semi-circles for two hunters. The reason for this is that I want a fairly enclosed cockpit, but I need to get my back as close to where the deck meets the gunnel line in order to stretch out my 6'-3" frame.
I ended up with a 10% dead rise for the shallow vee hull. I was going to go 6%, but Zack Taylor's Sneakbox widgeon and other sneak boats seem to use a 10 to 12% dead rise angle for a planning hull. (Zack Taylor was a Field and Stream editor and author of many duck hunting articles. His book, Successful Waterfowling, 1974, is an excellent book on the subject and includes numerous plans. I did built his scull boat in the 70's, but it was not a good design. He is best known for his Zack Box.)
1. The front of the cockpit will have a vee to split waves during rough conditions. It should also have round holes or slots recessed in the cockpit combing. During rough water rides, I can drop in a raised, canvass windshield. The windshield will have Velcro attachments to the outside of the cockpit combing.
2. The cockpit combing should be three inches wide to accommodate aluminum pipe or schedule 40 plastic pipe set flat into the cockpit combing. Into these spaced holes I will drop in different size camo screens for different cover or different heights.
3. Devlin's (www.devlinboats.com) boat plans promote the recessed motor mount. I have used this in past designs, but I have never been convinced they hide the motor any better moving it forward. To accommodate this shift in weight of both the motor and the operator, Devlin puts in a 2" rocker in the stern so that his Scaup and his other sneak boats will pull up the nose of the boat in choppy conditions under power.
I took an idea from Gator Trax boats. What Gator Trax did for the transom and motor mount was to add a shallow deck on the stern section. The motor mount is raised up in the center to 16", but the 20" long deck is maybe 10 inches high than the waterline.
Another idea that I will take from Gator Trax is anchor poles. Gator Trax put rings both fore and aft to drop in a pointed aluminum pole to anchor the boat to the bottom. This sure makes it easy to pick up decoys.
4. I will have navigation lights and a head lamp, but what I am thinking of now is a safe place for my new Mr. Heater Buddy. Years ago I found a guy on-line who made an aluminum oven for his heater.
5. I am also thinking of placing a receiver for a winch system in the bow.
Here are the steps in this building process that I will update.
Step 1: Sketch a boat and then draw it to a scale based on 1.5 inches equals one foot.
Step 2: Loft the boat full scale on paper and pull off the offsets for each station rib.
Step 3: Construct a 4x16 elevated building table. Oh, I wish I could do this step over. In my haste, I forget that the garage floor slopes. I should have built a level table based on the garage floor, and then I would not have had to shim so much!
Step 4: Cut out a station rib for each one-foot interval. Note: sometimes you can use two-foot intervals to save money on plywood. Each station rib is cut out with the hull station dimensions, as well as the top decking dimensions. A one-inch by one-inch seam is attached to each side of the station rib. This seam creates a lip for the top and bottom piece to be joined or glued together after the two pieces have been hand laid up and pulled off the plug. Later, when the top piece and the hull are set, I will cut off most of the joining seam and sand it smooth.
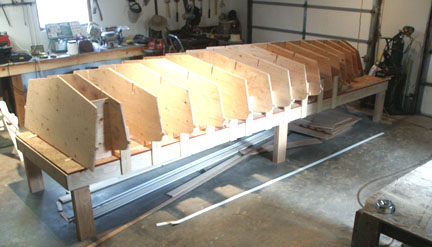
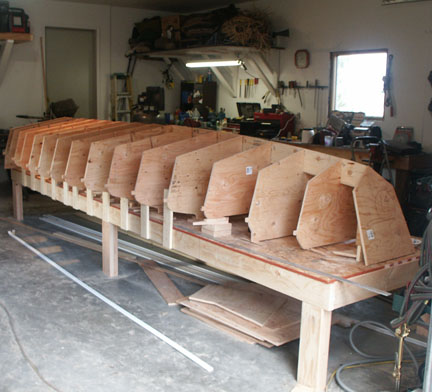
Step 5: Set up all the station ribs with the hull side facing up. I will use 3/8 plywood or panel sheets.
Keep in mind that the station ribs will not be perfect. The test of how accurate they are comes when you attach the skin. I will use 4'x8' vinyl panels for the skin. After all, this is a male plug. Any small imperfections will be lost when you apply the fiberglass layers to the outside of the boat. The vinyl panels are coated, which makes the waxing process easy. Plywood sheets require a lot of extra work before a smooth finish is achieved. I use an air staple gun with brads. These little holes will be filled with wax. The seams will be covered with transparent tape. How easy is that to wax! When the final boat is glued together these slight raisings of tape will be noticed inside the boat! If I was a perfectionist, I could sand them down.
I purchased 1/8 inch panels to pattern the sides and the bottom. You will be amazed at the curve in the side panel. I remember building my first drift boat. My eyebrows jumped in amazement when I saw the finished side panel. I start with an approximate pattern panel with straight edges. I use temporary screws to hold the pattern in place while it rests on the ears.
Next, I cut a thin piece of panel and tape it on the pattern panel making sure the bottom edge touches each station ear. (The ear will later be used to make a joining lip both for the hull and the top piece.) Now I trace this piece on to another pattern panel. Once I have the bottom curve, I slap it up on the boat and mark the top of each station. Now I have a final pattern that I can transfer to a 3/8-inch vinyl panel and attach to the station ribs.Before I attached the side panels, I used a grinder on the edge of each station that comes in contact with the panel. I used a bender board to see which stations needed to be rounded off. Once the panel is in place, tack the panel on to those stations that squarely meet the panel. This avoids forcing a panel. Instead the panel follows a clean line. Once the panel is attached in a few places, look inside where the panel needs to be shimmed against the station. I counted back to Station 8 and added a thin plywood strips to the station. This allowed me to attach two eight-foot panels to a separate piece of wood instead of trying to join two panels on one 5/8-inch station.
Step 6: Build a cradle to sit over the hull. Flip the boat over so that it sits upright in the cradle. Now, I will construct the deck piece, or the top piece of the plug. Construction material will consist of particle board, fine meshed screen and plaster.
Step 7: Finish the top deck piece. It will consist of lots of plaster. Paint the plaster with at least four coats of plastic varnish.
Step 8: Lay up the fiberglass on the top piece. When it has cured, flip over the entire boat again so that the hull or bottom faces up.
Step 9: Lay up the fiberglass for the hull. Let cure and then pry off both pieces from the mold. Discard the mold because the plastic will break; hence the name, "one-off boat construction."
Step 10: Reinforce the hull with support ribs or bulkheads.
Step 11: Glue the top piece and the hull together using the joining lips.
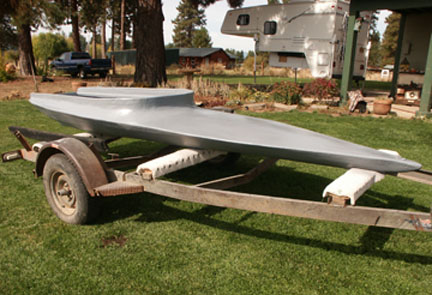
Step 12: Since this is a boat pulled off a male mold (plug), the outside has to be faired and sanded.
Step 13: Add drain plugs, lights etc.
Step 14: Paint the boat.
Step 15: Fabricate the blind or camo coverings, which includes the splash shield.