November 2010 Archives

Duck Hunting Expands on Upper Klamath Lake

| No Comments | No TrackBacks

me-on-tiller.jpg
Photographs courtesy of Don Archer

With the flooding of 2500 acres on Agency Lake (Upper Klamath Lake) by the Nature Conservancy, duck hunters have been probing and exploring the new terrain. Prior to the breaching of the dykes, I met an old duck hunter out on the lake one blue-bird day. We crossed paths on the open water and cut our engines to chat. He is in his mid-seventies, and he has been hunting the lake for over forty years. I candidly admitted that I had been lost in the fog twice that year and was contemplating buying a GPS. He was excited about the upcoming flooding and reclamation of old marsh. "Do you realize," he said, "that we have the opportunity to study and chart the flight patterns of ducks and geese on uncharted grounds. Get a GPS and keep notes!"

decoys.jpg

My first hunt was a disaster. I picked a partially submerged dyke with broken willows to back my grassed boat up against. In front of me I had a small body of water about twenty yards wide that followed the old dyke. This sliver of water ended up against a floating mat of straw that stretched for a half a mile. On the other side of this impenetrable tangle of mat, hundreds of birds flew in from the lake, crossed the new open water tracts and landed on the edges of the straw to rest. Six weeks into the season, the birds climbed high over every tree lined dyke. Probing the water I found depths of three to five feet on the edge of the vast swath of floating straw from the fall harvest. The next day I headed over to the Williams River area to find cover.

I positioned my boat in a cluster of willows with shallow water all around me. For the next three hunts, I did very well calling small flights of teal and lone mallards. I watched hunters at mid-day fire up their Mud Buddies and explore the area for back-water mallard water. My mid-November the large flights of teal zig-zagging across the new water seemed to disappear. The birds were not dropping into my stool and almost all of the flying birds were not responding to my calls. Even more frustrating, my boat was not positioned correctly for pass shooting. I watched enviously as some duck hunters fired at birds from their boat out in a maze of floating mat and tulle patches. As if I had eaten sour grapes for lunch, I told Don that they were probably shooting at divers.

muck.jpg
Towards the Williamson River a few fields remain uncovered by water but without any cover.

Coming in from my last hunt with one bird in hand, I decided to get as close to the shallows as I could. Earlier I had observed that the eastern edges of this new tract met fallow grounds infested with tall weeds. On my first outings I had not disturbed any large concentrations of birds hiding in the thick maze. But this time my old friend Don Archer and I watched as mallards jumped from the edges as far back as a fifty yards in this weed, congested thicket. I looked for any tell-tale signs of a boat dragged into this cover, but I found no signs. I stood up on the highest position on my boat and yelled Eureka! I spotted a pot-hole in the jungle. Meanwhile, the birds we jumped were already circling back and dropping into the tangled web of brush and weeds. Moving down the shoreline I spotted another pot-hole and some dark silhouettes. "Oh, oh," I said to Don. "I think I am looking at some decoys." Just then a guy stood up and lifted both arms in the air in frustration. They had passed up firing on ducks directly overhead not wanting to give their secret location away to us. I gave a friendly gesture back and moved out of the area. At least he had not given me the middle finger salute. I have been very tolerant of exploring duck hunters stumbling onto my spread. After all, the flooding took place almost a month after the season opened. I hope this courtesy continues as duck hunters move in and out of the area trying to find good locations.

Don-boat.jpg
Don Archer waits for my lab Buddy to take a leak.

Initially I was worried that too many hunters would pour into the area. So far that has not been the case. Most of the newly flooded land is large tracts of open water adjoining the lake. Many of the local hunters still return to their favorite spots at the mouth of the Williamson River and along the tulle shores of the straits. With the exception of divers, mid season typically slows in the number of puddle ducks that stay in the area. I am just delighted, however, that in these times of high fuel costs, I have a new hunting area only a few miles from my home. It will be interesting to see how the new marsh comes to life with tulles and bulrushes. A spokesman for the Nature Conservancy said that in a test section the tulles came up in two years and in five years the test section had matured. So far I have only found three entrances through the "breached" dykes, although the tract can be accessed from the Williamson River. Any duck hunter worth his salt will find the "secret spots." If we are tolerant of each other this season and demonstrate good manners in the marsh, all of us are going to have a lot of fun figuring out how to hunt this newly created marsh. Additional marsh will be created east of the Williamson River adjacent to Goose Bay. According to Matt Barry, project manager for the Conservancy, as reported in the Herald and News, November 19, 2007, 2200 additional acres will be flooded surrounding Goose Bay. Barry estimates that the water level will be lower than the other areas, which should attract puddle ducks. Best of luck!

Dave Archer
dave@glaciertoyellowstone.com

Duck Hunting with a Scull Boat

| No Comments | No TrackBacks


By David Archer
Copyright David Archer 2010

Note: I sculled for twenty years in California, Wyoming and Montana. After a ten year hiatus and two total shoulder replacements, I will give it another try this fall in my own scull boat design, which is similar to the Humboldt design.

scull-1.jpg

Hunting ducks on open water in a scull boat had its beginnings during the market hunting era on both the East Coast and the West Coast. With the improvement in boat construction using fiberglass materials, sculling saw a resurgence during the 1960's and 1970's. Today dedicated scullers still ply their stealthy craft on waterways across the country. It is a small fraternity of men, however, and sometimes it can be tough to find a mentor. Much information may be gleaned from an on-line sculler's forum and other dedicated sites. The following article covers the basics before someone attempts to buy a boat and learn on his own.

scull-office.jpg

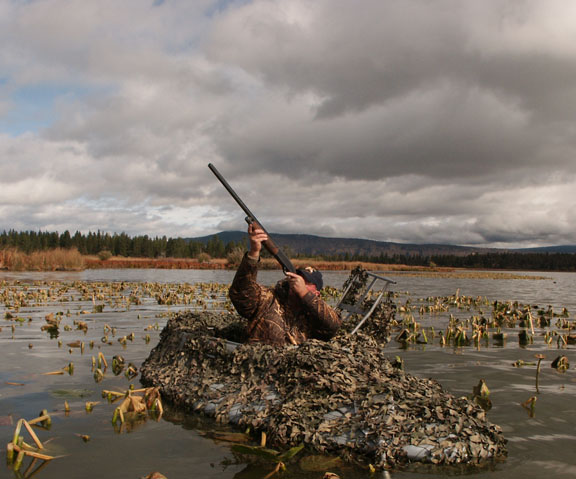
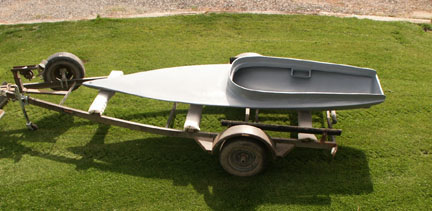
A traditional West Coast two-man scull boat is 14' in length and powered by a long, slender sculling oar that exits the stern through a rubber boot. Laying on his back, the sculler adjusts the oar so that the curved part of the blade is facing up and the flat side facing down. If you are right handed, the starting position would be to grip the end of the sculling oar so that your clenched hand is holding the oar in a straight line, resting slightly over your left shoulder. The sculling motion is a figure-eight rotation of your wrist. This pushing and pulling motion propels the boat forward. However, if it is not a fluid motion, the boat will rock from side to side. Do not exaggerate the figure eight motion. Keep it tight. If I am at rest and want to begin the process, I would cock my wrist in the downward motion, which then tips the blade on its side. I would then pull the handle up towards the top of the figure eight. At that top point I would rotate or cock my wrist back so that my next motion would be a push motion. The pushing motion would drop slightly to the bottom of the figure eight. At the top of the stroke, I rotate my wrist to the downward stroke and pull back. Naturally, the wider the figure eight and the slower the movement and the boat will begin rocking or moving more to one side or the other.

hole-boot.jpg

Turning the boat slightly necessitates that you either pull or push the oar in the figure-eight motion. For example, if the sculling oar is in the correct position with the flat bottom facing down, and you rotate your wrist and pull or push the oar, the nose of the boat will glide around to the new position. However, after each push or pull, you will need to re-position the oar straight behind you, flat side down so that it can slice through the water and not block the boat's turning progress. You wait to make some progress before repeating a push or pull movement. Slight adjustments while sculling is just a mater of prolonging a push or pull action slightly longer. (Yes, it is possible to scull in reverse, but I could never get my mind wrapped around the mechanics so I was never successful.)

Since the sculling boat has a long keel on the bottom, the keel helps track the boat in a straight line. Nonetheless, the trick is to keep the figure-eight strokes short so that before the boat goes off its straight line, the sculler adjusts or shortens the stroke with the opposite push or pull stroke. To increase speed, the left arm is lifted up so it is resting on top of the sculling oar with the left hand gripping the oar just in front of the right hand. You generally have to scrunch your body and shift to the side a bit, but this two-handed approach allows us weaklings a strong method for "sprinting" or closing the distance just before you sit up to shoot. Strong men close while sculling with their left arm and hold their shotgun with the right hand so that they lose no time sitting up and getting off a shot.

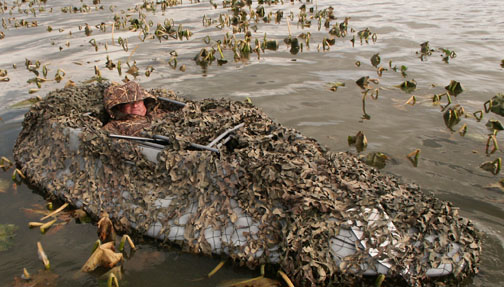
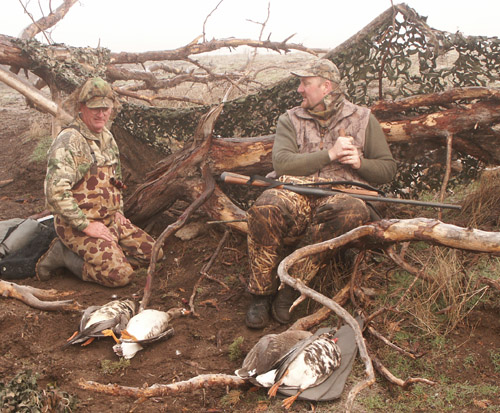
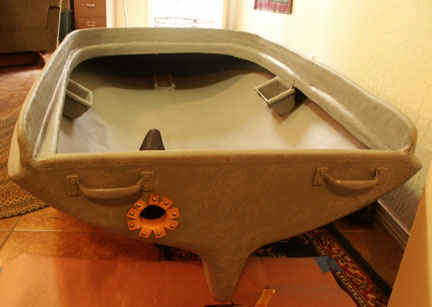
Most scullers use a kayak paddle or a set of oars when they want to retreat from rough water. In the past, I kept my life jacket as a pillow to prop up my head. The idea is that you want to have your eyes barely peaking over the front combing. (Black face) Because of the possibility of a wave rolling up the deck, a small combing is essential. Years ago the Lynn-Lee scullboat was equipped with a canvas wind shield. Similar to an old baby buggy, the windshield (wave shield) would pop up and be secured with two bungee cords.

The boat would seem dangerous, but I have been out in choppy water in three separate designs, and I always felt safe with a few exceptions where I found myself a mile from shore in rough water. In this situation, pull out the stowed outboard motor and head for shore using your kayak paddle to negotiate the waves. Another safety measure is too toss your lead weight overboard. Since you need about a 70 pound, lead ingot shoved to the very tip or bow of the boat, the easiest method is to have a long rope attached to the ingot. (This bow weight is to keep the bow tip as close to the water as possible. Birds looking at the approaching scull boat see a deck that gradually rises from the water to the combing. It looks like a partly submerged floating object.) At the end of the rope, attach the floating rope to a decoy. If the water is not too deep, the decoy will mark the spot so that you can retrieve the weight later. In twenty something years of sculling, I had to do this only once, although a number of times I pulled the weight to the center of the boat to keep the nose pointing up during rough weather.

So, just what is safe? I have seen scullers in really rough, choppy water, but I thought they were foolish. I head for shore when the gentle waves start lapping my boat or when I find that the boat is hard to control when it is lifted up in front. During rough weather, work the shoreline in two to three feet of water. It is hard to get off a good shot due to the rocking motion of the boat, but you will be amazed at how close you will get to the birds that have landed and walked up to the shore. I have also worked geese close to shore with two to three feet of waves. I would get within ten yards, but when I would drop into a trough, they would disappear. And when I tried to get off a shot, a wave would push me out of alignment. It was pretty funny the times that I would try it from the safety of near shorelines.

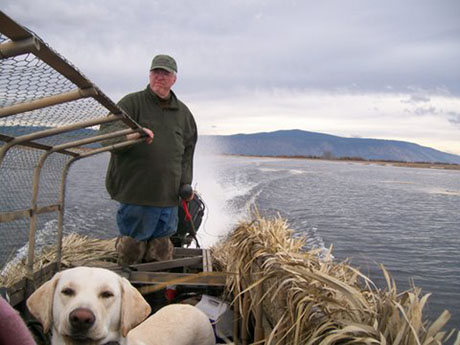
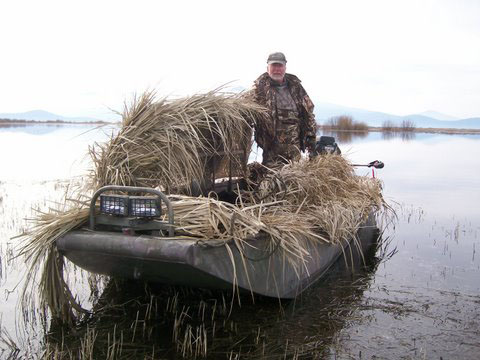
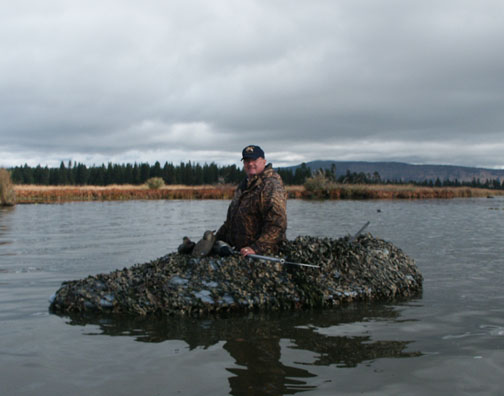
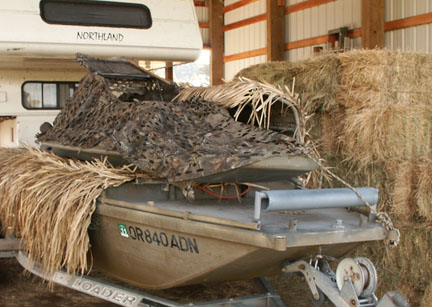
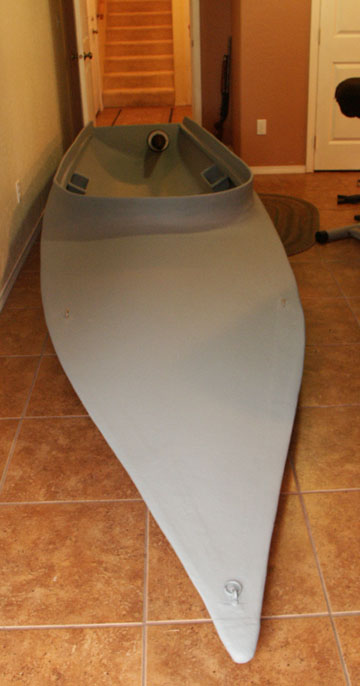
Scull boats make excellent layout boats in the marsh or in flooded fields. As always how well you cover the boat is a key factor. Remember also that you have a limited shooting arc of shoulder movement. You do not need camo or netting when you are sculling out in open water. The preferred color is dull, battleship gray.

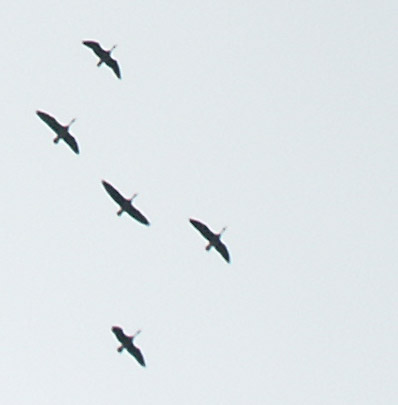
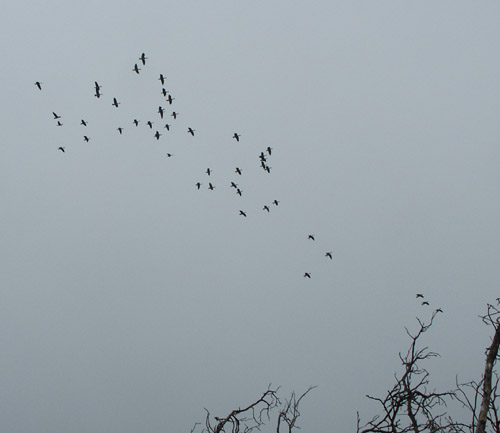
Open water sculling is exciting. It is the essence of sneaking up on resting birds out in the open water. It can also be frustrating because larger flocks tend to jump early sending the entire raft into the air before you are in range. Ah, shit! You say to yourself as you sit up to stretch. To your great surprise a few singles in easy range jump when you sit up to stretch. Always sit still and survey the area before you sit up to stretch. I can't tell you how many single geese I have taken after the roar of thunder when a big flock got nervous and took flight. Early on in my learning curve I thought the remaining singles or pairs were wounded or crippled birds, but when I pursued them too fast, they would jump up and fly away! (You will need a good set of binoculars to spot birds that are worthy of a 100-yard scull.)

If you are new to the sport, pick off the trailing pairs and try and gradually separate them from the big flock. I would say that if you take your time, don't rock the boat or show too much of the boat's side profile, you have a good chance to separate birds and get off a shot. Regarding the first shot, I will say up front, that I have peppered resting birds with a sluice shot on open water many times. Giving how much work it is to spot a raft, sneak up on them and close the range, I will not apologize for occasionally sluicing birds on open water. Most of the time it is not necessary. Many times you will sit up and they freeze in shock. I have missed easy shots when this happens.

One effective open water tactic is to set a dozen decoys out in open water. Back off a hundred yards and drop a lone goose decoy or magnum mallard with a heavy weight. Tie your scull boat to the anchored decoy and stay put until birds land in the decoy zone. Sometimes after a scull you will head back to your anchor decoy and suddenly see two or three birds hanging out at your previous resting spot. Use the sun so that it is behind you. Resting birds don't like to look into the sun for very long if they think that you are just a slow drifting log or object. Fog is good until you get lost and birds appear out of nowhere ten feet from the boat. Needless to say too much fog defeats the purpose. I never wanted hamburger in the bottom of my boat.

Sculling into bays can be very effective. I have sculled on birds until I hit the mud and stopped forward progress. I have been within fifteen yards. Pick a single bird and stay with it until it drops. These are weird situations, and when I was young I would have visions of birds falling out of the sky with three shots! Flock shooting is a difficult lesson to learn. I ounce worked my sculling boat on swimming geese that headed to a flock of geese just off the shore. They went right into the "dekes". When I realized what I had done, I sat up unarmed and the birds took off right in their spread. Two Montana hunters stood up without shooting. They had a safe shot, but they too were shocked with the entire episode. They had never seen a scull boat before, and when they realized what I was doing they decided to honor my scull. Too bad no one shot as all three of us could have had a safe shot. They told me that if I could do it again at a safe angle, we should all shoot. I just laughed but later in the day I chased some mallards towards their spread. The birds got nervous and jumped up and flew into their decoys. Safely out of distance I watched them drop some mallards. I would think that a sculler at one end of a small lake would really be able to keep the birds moving down lake to a waiting layout boat hunter.

If you can get on a lake safely during winter, hunting the ice edges can be awesome. Bring a fishing pole with a nasty lure with large treble hooks to retrieve downed birds on the ice. Never go on the ice! Never go on a lake during winter unless you have an easy put-in and take-out! Don't bring a dog with you! Only go out on blue-bird days. Throw a white sheet on the deck, wear a white hat and jacket and you will have a blast. Finally, if you have a wet suit, wear it. To often, however, young men tend to push the envelope of safety resulting in tragedy. Regarding winter conditions, never scull on rivers! Scull boats cannot be turned sharply or quickly maneuvered. The only type of river I would scull on would be very slow stretches such as can be found on the Jefferson. Scull boats are not designed for rivers!

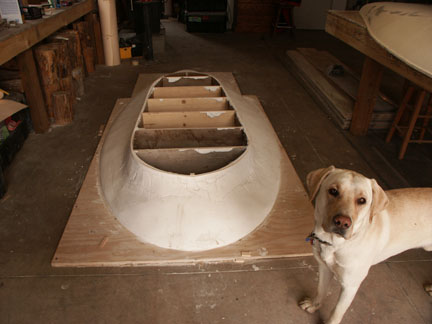
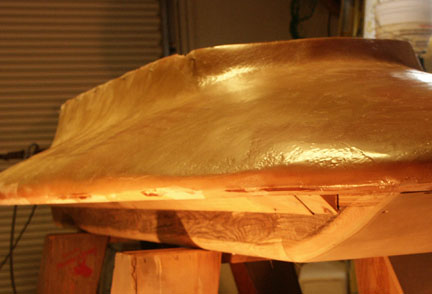
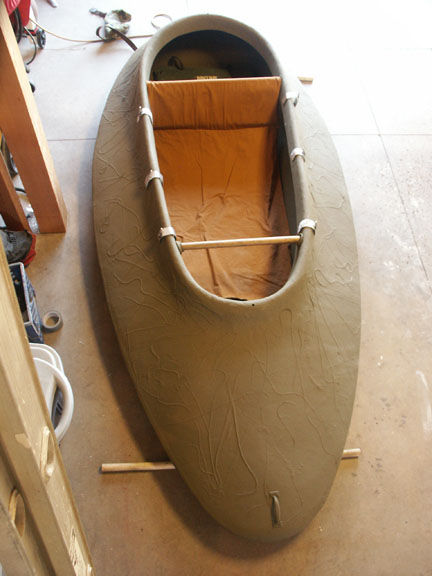
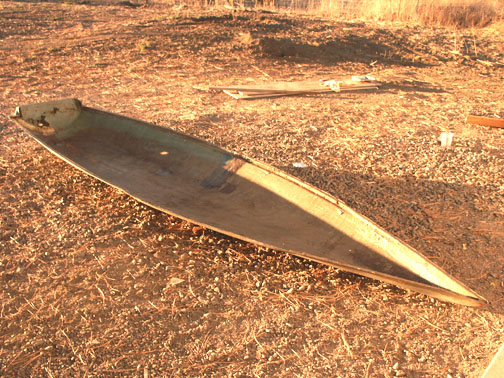
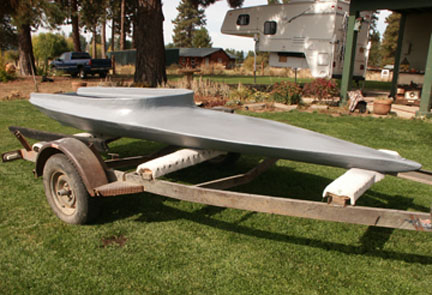
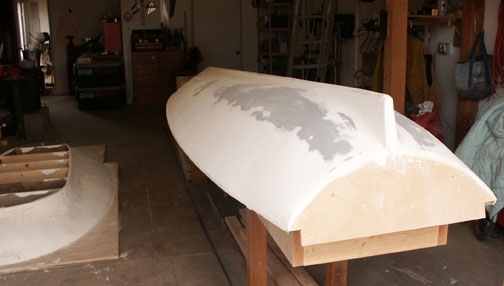
You will find many sculling sites on the Internet. You can still buy a boat in the Humboldt Bay area (Eureka, California). I do not believe that flat bottom sculling boats made out of wood are as effective as traditional designs. If I ever get around to posting this on my blog site, I'll post some of my old photographs, along with the scull boat that I am presently building. Heavier scull boats track in a straight line better than light boats. This is a fact. My best boat was a HEAVY wood / fiberglass boat. It had a FULL running keel. The cockpit combing was so high compared to other scull boats that it had a notch cut out up front to track the birds. I bought it from a man in Eureka who wanted to buy a two-man scull boat. That boat was the best damn boat I ever owned, and I have owned five scull boats, and I am presently building my last boat. One stroke and it would glide in a straight line effortlessly. I sold the boat to a friend so that I could have a two- man boat. Later the man who sold it to me tried to track the boat down after my friend sold it! Even when I was young, I would struggle loading it into my truck. I should have...yeah, I sold my 39 Chevy when I got out of the Army too!

Finally, the first season of sculling is quiet often disappointing. During the 70's I would watch men try and scull and end up selling their boats before the season was over. I didn't get many birds my first year, but I started getting close limits the following year. It is important that you have someone give you a lesson on sculling. Sit up on the deck combing and video-tape the lesson. Get on the sculling forum and ask questions. If you are going to hunt on open water far from shore, have someone on shore to come out for you in a "mother" boat if the weather changes. Cell phones are great for that situation. Better yet, tow the scull boat on a scouting trip and take turns with a friend during the middle of the day!

General Observations:

Closing the distance: Remember that when you are sculling or chasing birds on open water, they are swimming away from you. When they jump, you are shooting not their exposed breast and belly but their backs. You must be close for a clean kill, and truth be known, you end up shooting a lot of cripples on the water. Also keep in mind that when the birds jump, they are going to get a couple of wing beats, five to ten yards, before you can sit up, take aim and fire. (Shoot slightly under the birds as they rise off the water flying away from you.)

Study their behavior: If they stall and shift around, they are ready to jump. If you can see color and details, they are in range. If you have a pair that keeps turning left and then right to look at you while they are swimming, wait until they turn to a profile and then take the shot. Geese will simply try and out swim you so use two hands to close the distance or back off and go slower. If a couple of ducks or an entire raft jump when you are just out of range, NEVER fire. If you stay down, they will most often just glide a hundred yards and then land. I have closed in on geese like this two to three times before I dropped one or more of them. Again, remember that there will always be a few birds close by that stay on the water.

Blacken your face and keep your hands down: If geese swim to shore before you close the distance, they have an advantage as they can stretch their necks up and look inside your boat. If they see your arm or wrist move, they will sound the alarm. (90% of the birds that you flare will be because they saw your wrist move above the combing. Use a black golfer's glove to protect against blisters and camo the rest of your hand, along with your ENTIRE face, and NEVER move your head around to see which birds you will scull towards.) Just as you will have frustrating days wondering what you did wrong, you will have easy days when you scull within ten yards of ducks or geese.

Calm, sunny days are best because the boat has no chop slapping against the boat, and your scull can be smooth, silent and deadly.

Practice before the Season: It is essential that you practice your sculling techniques during the summer, and while you are at it, troll a fly or lure. The silent flash of the sculling oar attracts fish! The greatest challenge is to drop the oar and set the hook. The easiest birds to scull on are mallards, pintails and Canada geese. The most difficult birds to scull on (from my experience) is widgeon. They are nervous birds in a flock. They will start a roll where the nearest group flies up to the front positions, and then the roll continues.

Only use your binoculars for spotting and targeting birds. Sometimes you will lose them in the glare or fog and you will have to glass again to ascertain your bearings. Over-and-over again, throughout my years, I would spook birds that were close by when I slowly lifted up the binoculars. Sometimes it would be reflection off the lens, and sometimes it would be the movement.

Always blacken your face. If you wear glasses, use a single lens, as when you are laying on your back the bi-focals will get in your way.

If you penetrate a flock and parted birds see your side profile and movement of the oar out through the transom, they will flare. The biggest problem with sculling is heading into shore and running out of water. It sure is frustrating coming to a halt with undisturbed sleeping birds just out of effective killing range. If you scull shallow water, you will need a sculling blade that is straight versus the slightly dropped blade, which is most common. You need both types of blades on hand for shallow conditions.

Blades are made in a variety of materials and fiber glassed to a wood 1 ¼" closet pole. Here is what I have.

Blade length: 36 inches (rounded on top the height of the blade tapers to the tip of the blade. The blade and the handle are encased in cloth and resin)
Blade width: 3.5+ inches
The blade tapers to the tip at ¼ inch.
Where the blade connects to the pole, the thickness is 1 ¼ inch where the top of the blade slips into a vee in the pole. These measurements are the finished product when it is glassed. The notched vee in the pole and blade is 7 to 8 inches. Use a resin grout to fill any cracks, and then sand and shape it smooth and use cloth and resin from the tip up the pole for about eight inches. Sand and paint gray. (Tip: Cut a small V where your hand grip goes. This will indicate the correct position of the blade indicating correctly that the rounded or contoured edge of the blade is facing up. This is always the starting position.

I once had a shorter and fatter blade. The blade was made in a plaster mold with a balsa wood core. It too was a good blade. The key is that the blade must be flexible, even whippy.

I hope this helped.

Dave Archer
541-783-3796

Building a Layout Boat and Scull Boat

| No Comments | No TrackBacks

Building a Fiberglass Layout Boat and Scull Boat
Building From a Plaster Male Plug--A One-Off Boat

scull-1.jpg

You have to be passionate about designing and building your own boat from a plaster mold. You won't save any money, and the hours in construction are endless. Moreover, layering and shaping plaster is the easy part--waiting for the plaster to dry in cold weather is torture. And finally, when you build off a male plug, your boat will be smooth on the inside and rough on the outside. I decided that I would not be the perfectionist and sand and fair the lay up until it was smooth.

Begin by drawing and lofting your boat full scale. Break down your lofted plans to one-foot increments and pull off station ribs. Fasten your ribs with long strips of thin Masonite or paneling or any thin veneer that you can buy cheap. Use stuffed newspaper or foam for hard curves or the front of the boat. Cover with a fine mesh screen and start plastering.

lay2.jpg

I tried working with plaster in a cold shop that hovers around 40 degrees. It doesn't work, and I knew it wouldn't work from a previous plaster mold that I built 20 years ago. Funny how some people just ignore their past. Do your plasterwork during the spring and summer. Put your plug on a wheeled frame or wagon and pull it into your garage at night or if it looks like rain.

Sanding plaster is easy, but it is harmful to your lungs so always use a good respirator. When you have finished your work of art, you will need to paint the plug with a plastic varnish. I put on four coats and sanded each coat so that I ended up with a very fine finish. Now, put on at least four coats of release wax and buff each coat. Spray on a couple of coats of PVA release film just before you do your resin lay up.

stv-lay-knell.jpg
Photo of Steve Barrows of Klamath Falls knelling in layout boat.

Warning: A one-off boat is just that! When you pull off your cured boat from the plaster mold, you will have to do some pounding with a rubber mallet. You will need to drive wedges between the mold and your finished boat. The mold will be destroyed. My combing, despite my efforts to flare the inside sides out for easy release, just didn't want to come off easily. I had to use a lot of force and scrape off the plaster later when the boat finally gave up the mold. I am still disappointed that this release was so difficult. I actually got two boats off, but the last boat literally destroyed the entire mold. It was real carnage. Again, this process is a ONE-off technigue.

You will need to build a top piece and a bottom piece, which you will join together. They must perfectly align. Note that the top piece of my layout boat is built on ¾-inch plywood. I marked a line and cut around the top piece, leaving a one-inch lip to facilitate bonding the two parts. I then made an exact pattern for the bottom half of the boat.

Lay-bottom.jpg

When I started designing my layout boat, I couldn't decide between a flat bottom or a slightly rounded bottom. I started surfing the web and found the Mighty Layout Boy's website. My top piece was a replica of an old boat that I built with a whaleback top, but their idea of a recessed bottom intrigued me. Their recessed, dropped floor is four inches below the waterline. I decided that my weight and my dog's weight would require five inches. Four inches would have been fine. I decided I wanted my layout boat to plane when pulled so I gradually tapered my bottom right up to the nosepiece. It pulled great until my friend and I made a turn out in open water with small white caps. The flared wing design and a broaching wave almost sank the layout boat. It was a sobering lesson. After all, the height from the water edge to the combing is only 11 inches! Add five inches under the flared sides and my total height from the bottom to the top of the combing is 16 inches.

My layout boat is 10.5'. The drawback is that it weighs 105 pounds. I used four layers of mat and probably too much resin, as I worked alone, and often found that I had to slather the resin on the mat and work like hell before it set up. This is not a good practice. Get help and keep the resin saturation to a minimum.


Layout3.jpg

If you wonder what the hanging metal pieces are on the combing, they are metal hangers for netting. They were a pain in the ass, and I went to a permanent camo attachment. So just how low do you have to be in a layout boat? Could I build an aluminum frame to hide my lab and myself? Would the extra height defeat the design?

Using ½" aluminum tubing and flat strap pieces, I built a flat frame for my friend Steve. It has a flip-open door. It is especially effective out in the open water. My own frame has a flip-open door that is pushed behind me with an attached wood dowel. Laying down I am completely hidden, although my lab can be seen from behind. It worked great. I only need a little patch of tulles or grass. I soon found that I could sit up partially and lift the lid higher by using the dowel. If you look at my friend Steve sitting in decaying wocus, you can see that he has a clear advantage of not hunting with a dog and keeping a very low profile.

lay-4.jpg

The layout boat is an awesome little boat. I will use it more and more. Looks like my expensive aluminum sled with mud motor will now be a ferryboat.

lay5.jpg

lay6.jpg

lay7.jpg

Building My Scull Boat

I hunted from a scull boat for over twenty years in three states. When arthritic shoulders caused me too much pain, and I could no longer sprint after geese, I sold my boat. As the years went by I felt a sadness that I no longer participated in this old tradition. When I met Matt Keller, a seventy year-old sculler, I knew that I wanted another scull boat, but this time I wanted to build it myself. After all, I had a 16' aluminum duck boat that I designed and built, I had a 10' pram that I made from plywood, I had a 13' aluminum river pram, and most recently I had built a layout boat. I had one more boat to build and that was a 14' scull boat.

Hull.jpg

I found a beat up bottom piece of a scull boat in Eureka, California. It was old and the seller had no idea where it came from. It had a big split in it, and it was warped. It only had a partial running keel, and the transom wood was completely rotten. Still, I figured it would save me countless hours in having to build an entire male mold from scratch. The split was easily repaired; the warpage and twist was another matter. I used a ton of plaster. So much so that in the end I decided to ignore the imperfections and just get it done.

My last boat that I used for years was a Lynn-Lee boat. These two men were welders in Benicia, California. I met them sculling on Cliffton Court Reservoir on the Sacramento delta. They were awesome scullers. When I met them I was on my third scull boat, but when I saw their boat, I knew I wanted one.

The truth of the matter, however, was that my second boat was the best scull boat that I ever owned. I sold it because it was a one-man boat. It too was made in Eureka. The man who sold it to me sold it for the same reason. He wanted to take a friend out. Later he tracked me down. He wanted his old boat back. "So do I," I replied. I loved that heavy old boat. So why was it so effective?

scull-side.jpg

For one it had a full-length keel. Two, it was heavy. Once in motion it tracked well and glided through the water smoothly. Third, it had a higher combing. Birds never flared from my hands accidentally coming into view. I only have two old photographs of the boat, and I never measured any part of the boat. I just remember that laying down I had to look through a cut-out notch up front to track birds.

hole-boot.jpg

When I built this new scull boat, I agonized how high the combing should be. I lost faith in my old boat's design; after all, I sculled in that boat over 39 years ago. Perhaps it had a lower profile than I remembered. After all, lower is better! I ended up with 13 inches from the floor to the front combing. To my great disappointment, the transom rose to high from the slopping floor to the transom piece. This meant that my sculling oar hole would be above the water. Clearly, this is a disadvantage. For one, the sculling oar that I have does not drop quite enough. Secondly, because the hole is higher, it tends to push the end of the sculling oar higher, which means that one bad stroke and I would flare birds with the flash of my hand. I had Steve eyeball my simulated sculling motion, and he confirmed that I was not below the combing.

I had no hesitation now. I was forced to raise the combing from 13 inches to 17 inches, which is a whopping difference, and I have no doubts that in some conditions the additional inches will be a disadvantage. You will note that I have not as yet cut out the notch. I am waiting until I can afford a single lens pair of glasses. Right now I have tri-focals, and it is maddening trying to sneak up on birds looking through my reading lens.

scull-plaster.jpg

I am writing this report three weeks into the 2010 season. On the first week of the season, my second total shoulder replacement failed again. Now I am healing with a hemi-arthoplasty shoulder procedure. I told my wife that I had to scull the new boat and that I wouldn't take no chances. I carefully launched the boat one-handed and sculled out on a tranquil Wocus Bay of Klamath Lake. With my protected right arm at my side, I made my first scull in 12 or more years. So, how did I do? How did the boat perform?

I built the boat heavy-duty. In the full-length keel I laid a cut piece of Trec, plastic decking. I smothered this piece in resin and chopped fiber. Later, when I add a piece of aluminum to protect the keel, the screws will be going into plastic decking material and resin. Under the deck I also used a track of decking to slide my old lead ingot right to the nose. It is, of course, attached to a rope, and at the end of the rope is a boat bumper in case I have to chuck it overboard during rough weather. With my ingot pushed forward, my oar in the new boot, I pushed away from the boat launch.

It tracked wonderfully. When I shifted my left leg higher, the boat leveled out fairly close to what I wanted. Rocking was minimal, and I thought hell yes I can still do this. In short time, my left shoulder, which has also been replaced, began to give out. I thought to myself that I was in trouble if this was only how far I could travel without discomfort. I turned around to look back at the parking lot, and all the trucks were quite small! Time for a serious scull I decided. I made two sculls and flared birds so I was bummed. I rested awhile and then sculled twice on pairs of resting ruddy ducks getting within ten yards.

The next day I went out to Rocky Point or Pelican Bay. My first two sculls were sneaking up on small groups of widgeon. They would have been marginal shots, but hunting with a sawed-off shotgun (legal at 19 1/8 inch) with only my left arm was dubious at best. I had another failed scull when I spotted redheads. Was my profile too high? Had I rocked the boat too much? The redheads were scattered in with a hundred coots. It was windy, but the small waves were not breaking. I was pooping out fast, but I was impressed with how well the boat cut through the wind and rolling waves. Finally, I got above them so that I could scull down wind on them. I was close enough to see all the color of their plumage, as they rose and dropped in the chop. It was not important for me to get off a shot. It was important to me to see if I could get under 20 yards, and I was close.

I suddenly saw that a lone red head was within 15 yards off my port side. He seemed oblivious to my presence, while I was sculling as fast as I could. I turned the boat towards the bird. I got off a shot one-armed with my left, non-shooting arm. I missed! I actually expected him to drop. He was jumping into the wind, but I had only one shot. On the way in I sculled on four red heads and got within good killing range, but I didn't bother trying to shoot. I had shot at one bird and made a couple of good sculls. I was exhausted and elated. Let the healing begin. I have great hope for next year. I am pleased with my new boat.

Late Goose Season in Klamath County

| No Comments | No TrackBacks

Late Goose Season in Klamath County

Bros-keep.jpg

Goose hunting in March? You bet, and it's legal if you hunt on private property for the special depredation hunt for White Front geese in Klamath County. The old refrain, "You should have been here last week," was answered with a "We were, and we got skunked!" Two hunters and a fumbling cameraman and none of us fired a shot on our first hunt. But how sweet it was on this last day of a short, special hunt, and it was, indeed a special hunt. The Duck Commander would stroke his scraggly beard and nod his head in approval.

fourinflight.jpg

I joined Steve Barrow and his brother Cliff southeast of Klamath Falls on a piece of private property wedged between a couple of irrigation ditches and a nearly dry creek. The small rivulet opened up to form numerous shallow mud depressions, which drew in returning mallards. The previous weekend we placed our goose decoys around the shallow depression of the creek bottom, and huddled in a small washout. It was a bluebird day, and the only two birds that came in range chuckled as they looked down on us eating lunch and swapping old stories. Today was different, however. It had the foggy promise of a good shoot. Packing our gear across the field, we could hear the high pitched honks and cackles of birds directly overhead, invisible in the fog.

Steve suggested we place the decoys out in the field within shooting range of the shallow drop-off above the creek. We huddled beneath a lone and very large cedar. One of the trunks had broken off so we had some cover. As I had decided not to pay for an out of state license, I brought my camera. The barrow brothers had no sooner taken their position when multiple flights of geese dropped down below the fog and spotted our decoys. Three groups of twenty to thirty birds merged in one flight circling our sixty foot cedar. They split around the tree on both sides and dropped into the decoys. The Barrow men know how to shoot. In seconds both men had their two goose limit. And I stood under the tree gazing through the branches as geese dropped out of the sky. My camera was out of reach. It was classic, and the best part was that for the next three hours Steve and his brother called in small flights, one after another, hoping I could get some decent camera shots.

drop-in3.jpg

I had nothing but problems with my digital camera, but I had one of the best "hunting" experiences of my life. The Duck Commander would have had to film for days to capture the action we had in four hours.

Dave Archer