Building a Fiberglass Layout Boat and Scull Boat
Building From a Plaster Male Plug--A One-Off Boat
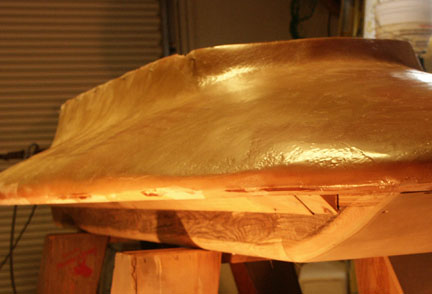
You have to be passionate about designing and building your own boat from a plaster mold. You won't save any money, and the hours in construction are endless. Moreover, layering and shaping plaster is the easy part--waiting for the plaster to dry in cold weather is torture. And finally, when you build off a male plug, your boat will be smooth on the inside and rough on the outside. I decided that I would not be the perfectionist and sand and fair the lay up until it was smooth.
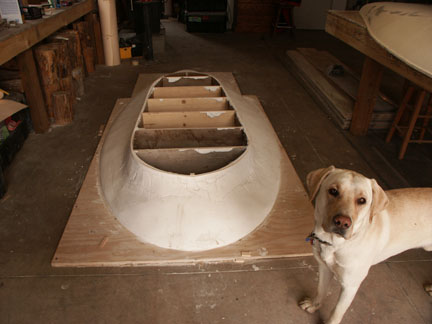
Begin by drawing and lofting your boat full scale. Break down your lofted plans to one-foot increments and pull off station ribs. Fasten your ribs with long strips of thin Masonite or paneling or any thin veneer that you can buy cheap. Use stuffed newspaper or foam for hard curves or the front of the boat. Cover with a fine mesh screen and start plastering.
I tried working with plaster in a cold shop that hovers around 40 degrees. It doesn't work, and I knew it wouldn't work from a previous plaster mold that I built 20 years ago. Funny how some people just ignore their past. Do your plasterwork during the spring and summer. Put your plug on a wheeled frame or wagon and pull it into your garage at night or if it looks like rain.
Sanding plaster is easy, but it is harmful to your lungs so always use a good respirator. When you have finished your work of art, you will need to paint the plug with a plastic varnish. I put on four coats and sanded each coat so that I ended up with a very fine finish. Now, put on at least four coats of release wax and buff each coat. Spray on a couple of coats of PVA release film just before you do your resin lay up.
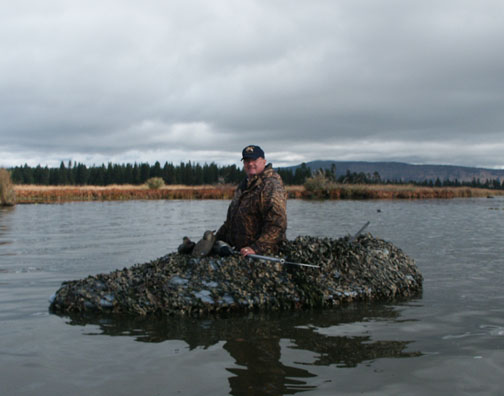
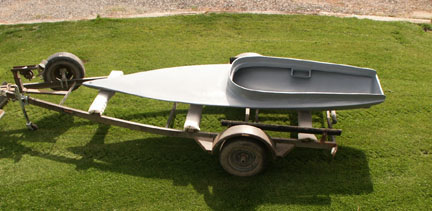
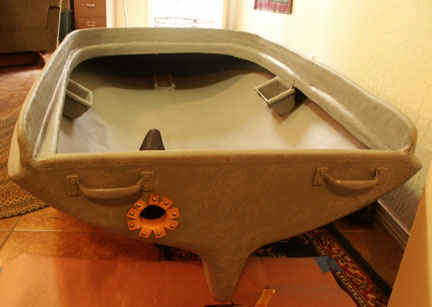
Photo of Steve Barrows of Klamath Falls knelling in layout boat.
Warning: A one-off boat is just that! When you pull off your cured boat from the plaster mold, you will have to do some pounding with a rubber mallet. You will need to drive wedges between the mold and your finished boat. The mold will be destroyed. My combing, despite my efforts to flare the inside sides out for easy release, just didn't want to come off easily. I had to use a lot of force and scrape off the plaster later when the boat finally gave up the mold. I am still disappointed that this release was so difficult. I actually got two boats off, but the last boat literally destroyed the entire mold. It was real carnage. Again, this process is a ONE-off technigue.
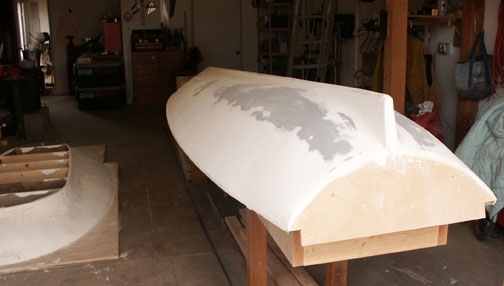
You will need to build a top piece and a bottom piece, which you will join together. They must perfectly align. Note that the top piece of my layout boat is built on ¾-inch plywood. I marked a line and cut around the top piece, leaving a one-inch lip to facilitate bonding the two parts. I then made an exact pattern for the bottom half of the boat.
When I started designing my layout boat, I couldn't decide between a flat bottom or a slightly rounded bottom. I started surfing the web and found the Mighty Layout Boy's website. My top piece was a replica of an old boat that I built with a whaleback top, but their idea of a recessed bottom intrigued me. Their recessed, dropped floor is four inches below the waterline. I decided that my weight and my dog's weight would require five inches. Four inches would have been fine. I decided I wanted my layout boat to plane when pulled so I gradually tapered my bottom right up to the nosepiece. It pulled great until my friend and I made a turn out in open water with small white caps. The flared wing design and a broaching wave almost sank the layout boat. It was a sobering lesson. After all, the height from the water edge to the combing is only 11 inches! Add five inches under the flared sides and my total height from the bottom to the top of the combing is 16 inches.
My layout boat is 10.5'. The drawback is that it weighs 105 pounds. I used four layers of mat and probably too much resin, as I worked alone, and often found that I had to slather the resin on the mat and work like hell before it set up. This is not a good practice. Get help and keep the resin saturation to a minimum.
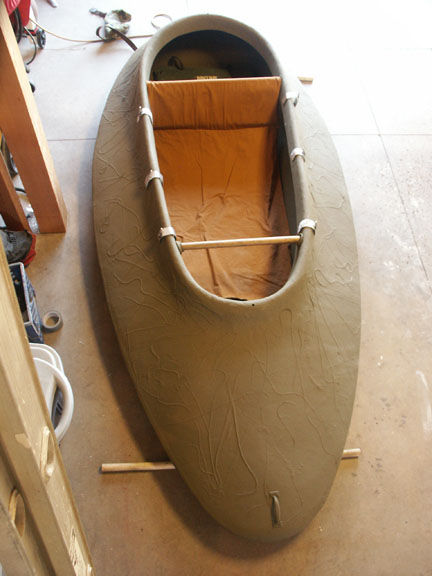
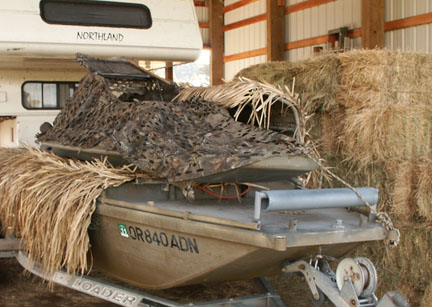
If you wonder what the hanging metal pieces are on the combing, they are metal hangers for netting. They were a pain in the ass, and I went to a permanent camo attachment. So just how low do you have to be in a layout boat? Could I build an aluminum frame to hide my lab and myself? Would the extra height defeat the design?
Using ½" aluminum tubing and flat strap pieces, I built a flat frame for my friend Steve. It has a flip-open door. It is especially effective out in the open water. My own frame has a flip-open door that is pushed behind me with an attached wood dowel. Laying down I am completely hidden, although my lab can be seen from behind. It worked great. I only need a little patch of tulles or grass. I soon found that I could sit up partially and lift the lid higher by using the dowel. If you look at my friend Steve sitting in decaying wocus, you can see that he has a clear advantage of not hunting with a dog and keeping a very low profile.

The layout boat is an awesome little boat. I will use it more and more. Looks like my expensive aluminum sled with mud motor will now be a ferryboat.


Building My Scull Boat
I hunted from a scull boat for over twenty years in three states. When arthritic shoulders caused me too much pain, and I could no longer sprint after geese, I sold my boat. As the years went by I felt a sadness that I no longer participated in this old tradition. When I met Matt Keller, a seventy year-old sculler, I knew that I wanted another scull boat, but this time I wanted to build it myself. After all, I had a 16' aluminum duck boat that I designed and built, I had a 10' pram that I made from plywood, I had a 13' aluminum river pram, and most recently I had built a layout boat. I had one more boat to build and that was a 14' scull boat.
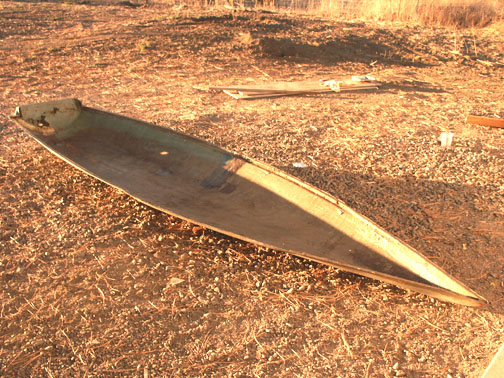
I found a beat up bottom piece of a scull boat in Eureka, California. It was old and the seller had no idea where it came from. It had a big split in it, and it was warped. It only had a partial running keel, and the transom wood was completely rotten. Still, I figured it would save me countless hours in having to build an entire male mold from scratch. The split was easily repaired; the warpage and twist was another matter. I used a ton of plaster. So much so that in the end I decided to ignore the imperfections and just get it done.
My last boat that I used for years was a Lynn-Lee boat. These two men were welders in Benicia, California. I met them sculling on Cliffton Court Reservoir on the Sacramento delta. They were awesome scullers. When I met them I was on my third scull boat, but when I saw their boat, I knew I wanted one.
The truth of the matter, however, was that my second boat was the best scull boat that I ever owned. I sold it because it was a one-man boat. It too was made in Eureka. The man who sold it to me sold it for the same reason. He wanted to take a friend out. Later he tracked me down. He wanted his old boat back. "So do I," I replied. I loved that heavy old boat. So why was it so effective?
For one it had a full-length keel. Two, it was heavy. Once in motion it tracked well and glided through the water smoothly. Third, it had a higher combing. Birds never flared from my hands accidentally coming into view. I only have two old photographs of the boat, and I never measured any part of the boat. I just remember that laying down I had to look through a cut-out notch up front to track birds.
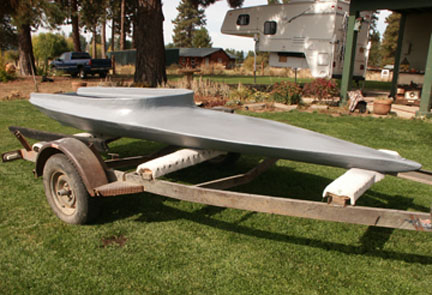
When I built this new scull boat, I agonized how high the combing should be. I lost faith in my old boat's design; after all, I sculled in that boat over 39 years ago. Perhaps it had a lower profile than I remembered. After all, lower is better! I ended up with 13 inches from the floor to the front combing. To my great disappointment, the transom rose to high from the slopping floor to the transom piece. This meant that my sculling oar hole would be above the water. Clearly, this is a disadvantage. For one, the sculling oar that I have does not drop quite enough. Secondly, because the hole is higher, it tends to push the end of the sculling oar higher, which means that one bad stroke and I would flare birds with the flash of my hand. I had Steve eyeball my simulated sculling motion, and he confirmed that I was not below the combing.
I had no hesitation now. I was forced to raise the combing from 13 inches to 17 inches, which is a whopping difference, and I have no doubts that in some conditions the additional inches will be a disadvantage. You will note that I have not as yet cut out the notch. I am waiting until I can afford a single lens pair of glasses. Right now I have tri-focals, and it is maddening trying to sneak up on birds looking through my reading lens.
I am writing this report three weeks into the 2010 season. On the first week of the season, my second total shoulder replacement failed again. Now I am healing with a hemi-arthoplasty shoulder procedure. I told my wife that I had to scull the new boat and that I wouldn't take no chances. I carefully launched the boat one-handed and sculled out on a tranquil Wocus Bay of Klamath Lake. With my protected right arm at my side, I made my first scull in 12 or more years. So, how did I do? How did the boat perform?
I built the boat heavy-duty. In the full-length keel I laid a cut piece of Trec, plastic decking. I smothered this piece in resin and chopped fiber. Later, when I add a piece of aluminum to protect the keel, the screws will be going into plastic decking material and resin. Under the deck I also used a track of decking to slide my old lead ingot right to the nose. It is, of course, attached to a rope, and at the end of the rope is a boat bumper in case I have to chuck it overboard during rough weather. With my ingot pushed forward, my oar in the new boot, I pushed away from the boat launch.
It tracked wonderfully. When I shifted my left leg higher, the boat leveled out fairly close to what I wanted. Rocking was minimal, and I thought hell yes I can still do this. In short time, my left shoulder, which has also been replaced, began to give out. I thought to myself that I was in trouble if this was only how far I could travel without discomfort. I turned around to look back at the parking lot, and all the trucks were quite small! Time for a serious scull I decided. I made two sculls and flared birds so I was bummed. I rested awhile and then sculled twice on pairs of resting ruddy ducks getting within ten yards.
The next day I went out to Rocky Point or Pelican Bay. My first two sculls were sneaking up on small groups of widgeon. They would have been marginal shots, but hunting with a sawed-off shotgun (legal at 19 1/8 inch) with only my left arm was dubious at best. I had another failed scull when I spotted redheads. Was my profile too high? Had I rocked the boat too much? The redheads were scattered in with a hundred coots. It was windy, but the small waves were not breaking. I was pooping out fast, but I was impressed with how well the boat cut through the wind and rolling waves. Finally, I got above them so that I could scull down wind on them. I was close enough to see all the color of their plumage, as they rose and dropped in the chop. It was not important for me to get off a shot. It was important to me to see if I could get under 20 yards, and I was close.
I suddenly saw that a lone red head was within 15 yards off my port side. He seemed oblivious to my presence, while I was sculling as fast as I could. I turned the boat towards the bird. I got off a shot one-armed with my left, non-shooting arm. I missed! I actually expected him to drop. He was jumping into the wind, but I had only one shot. On the way in I sculled on four red heads and got within good killing range, but I didn't bother trying to shoot. I had shot at one bird and made a couple of good sculls. I was exhausted and elated. Let the healing begin. I have great hope for next year. I am pleased with my new boat.
Leave a comment